Monday, January 30, 2023

Cupid Kisses

Hi my crafty friends, hope your weekend has been a great one and your week is off to a good start. 

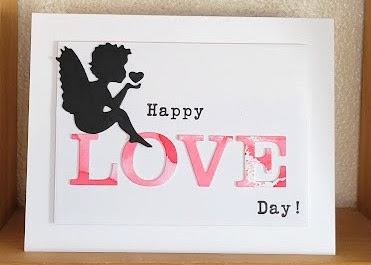
I have had this cupid die in my stash since 2019 and I'm just now using this cutie! I think I forgot about him. Shameful I know. It was a gift from a sweet blogging friend, she knows who she is and I am thankful for her and this little die. I decided I wanted him to sit on some letters. But really couldn't think of what word besides love. So that is what I went with. I think he looks so cute sitting on the "L" with his foot on the "O". I used some leftover background DIO smooshed paper I had made long ago for my letters. I did stack my letters, 4 thick and the cupid is two thick, his heart is just one layer. Not much to this card, but think it is cute. 


As always, thanks for stopping by, I know your time is precious. Hopefully I've been by to check out what you have been up to as well. 


Crafty hugs,


Card Recipe:

Cupid die - might be an unbranded die, I really don't know

Waffle Flower - A2 layering dies

Letters - My Creative Time letter dies

Happy/Day! - My Creative Time, "You Make My Heart Smile" stamps and dies

80 lb & 110 lb Neenah cardstock 

Versafine Black Onyx ink

snippet of black cardstock - Paper Studio


Tuesday, January 24, 2023

CAS Masculine Birthday Card

Happy Tuesday everyone. I hope your week is going well. 

I have been watching a lot of Chrissie Stokes videos and just love her style. Plus she is pretty funny to boot! She had enabled me into buying some gilding wax and gilding flakes. I have all the mica powders Bret gotten for me last year so used one of the colors for the first time on this card, along with the gilding flakes and wax. I cased her card which you can see here. I thought this design would make for a great masculine birthday card. Since it is Bret's birthday today, I decided to try out all these materials for his card. I do love the way it turned out even though I'm not super great with using these mixed media materials. It was fun playing around with them though and I definitely plan on playing with them more on future cards. 

Since I was going to be hand delivering the card, I went with a 5 1/2" square card. I also stacked the numbers 4 thick and layered the mat on foam tape. I am sorry for the blurriness, I was a bit shaky taking the photos and for the life of me, couldn't get a picture that wasn't blurry! Plus I think the silver flakes was messing with the camera as well. I embossed my 2 & 7 with the diamond plate embossing folder, stamped with versa mark and added blue mica powder on top of the versa mark. Added glue and silver gilding flakes, then added some gold and silver gilding wax as well, not necessarily in the order I listed. 


As always, thank you for stopping by and visiting with me as I know time is precious. I really want to say I'm sorry if I haven't visited you. I am trying to get to people, but without getting notifications anymore I tend to miss some of you. Again, I'm sorry...I try to come around as soon as I think about someone I may have missed. So unless you have a "follow it" tag for me to join, I don't get notified of when you post. 

Crafty hugs,


Card Recipe:

Numbers. Bret's name - Cricut Art Deco font

Happy, "th" - Agleisya Font using Print & Cut

Canon Printer

Arteza French Blue mica powder (Amazon)

Kinno Imitation Silver leaf flakes (Amazon)

Pebeo Gilding Wax - Silver and Empire Gold (Amazon)

Maymay Made It - Patina stamp set 

Cuddlebug Diamond Plate embossing folder

My Creative Time - Stitched Square Dies


Sunday, January 15, 2023

Meet My New Friend.....

Hello crafty friends, I hope your week is going well thus far. I wanted to introduce you to my new friend. He took me a year and a half to make. What?!! Yes, you read that right. A friend of mine asked me to come and lets each make one. But then things happened in her life and it was quite a while before completing this cutie pie. Meet Snowy the Snowman. Isn't he cute?! I'm not good at sewing, so my friend had to walk me through the making of Snowy. She provided all the materials to make Snowy as well. All wool scraps from her fabric stash. She does a lot of sewing, quilting and such so she has a nice stash of materials. The only thing I bought was the trim on his coat and hat. I had the buttons for his eyes and mouth, everything else was the wool material. We had a great time making our snowmen, but we always have a great time when we get together. I am not used to her sewing machines, she has fancy ones and I just have a simple one....so it was challenging a few times for me.  But with her help, I got Snowy done and now he is keeping me company for the winter. I hope you love him as much as I do!  Thank you Leslie, I love Snowy and thank you for all your help with making him as well as giving me all the fabrics to make him!!!


Thank you for taking time from you busy day to stop by and visit me. I appreciate you doing that! If I haven't been by, I should be soon. 

Crafty hugs,


Card Recipe:


Tuesday, January 10, 2023

Happy New Year!

Hello crafty friends, I sure hope everyone had a great Christmas. It was a good one here. I took time to really enjoy the season, so I'm behind in commenting once again. I will be getting back at commenting very soon. Happy New Year to everyone as well, hoping it's a great one for all of us! I'm also in wedding mode, Dwayne's cousin is getting married and I am doing everything "handmade" for the wedding. So far I've done the "save the dates" and they are out. Invitations are next.

I am posting the last of my Christmas cards from last year. Now got to get started making them for 2023. I used another Concord & 9th stencil for these cards, similar to the fall stencils I used. I was pleased with these stencils as well. So easy and so fun! I also got a Spellbinder's Glimmer Foil Machine for Christmas and made a December birthday card using it. I am loving it! 


And this is the birthday card I made for a dear friend and my first card made using the Spellbinder's Gimmer Foil Machine. The foiling was amazing, the rest of the card, eh. The vision didn't turn out quite like I had in my head. 

As always, thank you for taking time out of your busy schedule to see what I'm up too. I should be around very shortly to visit you as well. 

Crafty hugs,


Card Recipe:

Stenciled Cards:

Concord & 9th-Boughs & Holly Stencil Pack, Boughs & Holly stamp set

Hero Art ink cubes

Old Snippets of shiny glitter sticker paper-gotten from Amazon ages ago. Some Cricut Joy old card kit mirror mats and bases. Just stuff from my stash for the card bases, mats and strips. 

Embossing folder-I believe it was a Darice folder, but not sure

Birthday Card:

Spellbinders Glimmer Foil Machine

Glimmer plate-Christmas Foliage Background 

Spellbinder-Rainbow foil

Spellbinder's Stitched Hemline circle dies

Simon Says-Poinsettia die

Pebeo Gilding Paste from Amazon

Neenah 110 cardstock for card base