Showing posts with label Cricut. Show all posts

Monday, September 18, 2023

Wedding Cards

Happy Monday my crafty friends, I hope you are all doing well. It's been a busy week this past week for me. I finally got my car back, Bret had it for a month. His car's water pump went out and the mechanic couldn't get to it right away. Then once he did get to it, they found out that his timing belts needs replacing as well. Last Tuesday he got it his car back and I got my car back. So I ran errands and did some eye testing to see if I can stay on my Lupus meds for another year,  and other errands. We had a family wedding on Saturday, the one I made the invites and such for. Last night and today, I've been paying the price of the stress of the wedding (stress put on myself, not by anyone else), the embarrassment of a young fella (19) singing an Elvis song to me at the wedding, and all the excitement of the day and I found myself sick all night last night and today. I've has it happen to me other times-like when I went to the Outer Banks with my brother and his family, and right here at home three times. Not really  sure what triggers this "sickness" but when it comes on and one had better be close by the bathroom when it does!  I didn't get the stinging palm rash this time though. So that was good. Lupus is such a fun friend to have. LOL Not really!

So I'm sharing wedding cards today.  I just made simple CAS wedding cards but am pleased with how they turned out. I hope the brides and grooms enjoy them as well but I'm sure they will enjoy that is inside them more!  


Used a Cardz TV sketch below to make this one. Made for a quick and easy card. But then all of them were quick and easy makes.


That's it for me today. Thanks for stopping by to visit and see what I've been up to. I know I'm behind once again with visiting you...nothing new there, but I hope to get caught back up this week as short lived as that seems to be. But it is fall or will be next weekend, then winter, so I will be hold up in the house a lot then and shouldn't get so far behind as much. 

Crafty hugs,


Card Recipe:

Card 1:
Tim Holtz Alterations Sizzix 3D embossing folder
Spellbinders Arches Dies
My Creative Time "Wishing You Both the Best" stamps and dies
foam tape
Ohuhu Alcohol markers

Card2:
SU Painted Texture 3D embossing folder
Spellbinder Jan. '23 Small Die of the Month "Sentimental Ampersand"
Cardstock snippets from the snippet drawers
Cricut Joy to cut the Mr., Mrs.

Card 3:
WR Dotted mini embossing folder
My Creative Time "Wishing You Both the Best" stamps and dies
foam tape
Cardz TV sketch #48

Saturday, September 2, 2023

Thank You Cards

Hello my crafty friends, I hope you are enjoying your weekend and keeping cool. 

I needed a few thank you cards. One for some produce someone gave me from their garden and another one for the help a neighbor gave me when I got locked out of my house earlier in the week. That is quite the story! Long story short, Bret installed a smart lock when my regular lock broke. I thought I gave him fresh, new batteries....but nope, come to find out they were old used batteries. So I got locked out without my phone and Savannah was locked in. Didn't know anyone's phone numbers off the top of my head because who memorizes them anymore?! Had two neighbors helping me, one who tracked down Bret's number and one who drove me to Bret's place, only to find out he was at my house. Anyway, I paid my neighbor handsomely but wanted to also send a thank you card. Yes, I got back into the house thanks to Bret, he had the key and also replaced the batteries with nice new fresh ones! Lesson learned, get a key made to hide and I have memorized Bret's phone number. I had myself all worked up to say the least, took me a few days to recover from it!  LOL 

So here are my simple thank you cards. The first one is a CASE of Carol's patchwork cards. Love those and thought it would work great for a thank you too. I just cut out (guessing at sizes) my panels, then did a print then cut of the veggies with some extra's so I could layer it up. So the veggies were attached together before printing then cutting. I cut an extra cabbage and two zucchini's. Layered the cabbage on foam and attached to the group veggies, then added double layer of foam on the ends of the zucchini with one layer in the middle and placed on top of the cabbage. I forgot to get a side view of the dimension, but love how it came out. Cut out a "thanks" die and layered it up three times, glued it down and called it done. All snippets on this card but the card base and mat layer. 


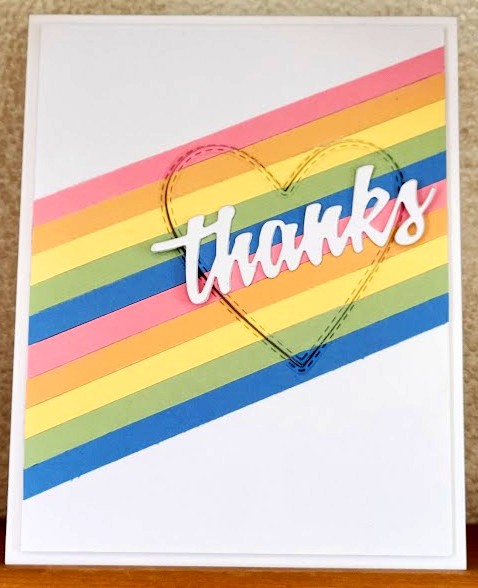
This is the one for the neighbor, again a simple but effective thank you card I think. I cut some snippets into 1/4 inch stripes and layered them in rainbow order on my mat layer...yes, I forgot the purple! Duh to me!! But anyway, then die cut my heart out of the the panel. Popped the panel up, then double layered foam for the heart and placed it back in. Layered 3 "thanks" together and glued it down. Done.  I am happy with both cards and they were pretty quick to make which is always a plus. 


Thanks for taking the time to stop in to visit with me. I will be by to visit you as well! Enjoy the weekend! 


Crafty hugs,


Card Recipe:

card 1
snippets from the snippet drawer
Cricut & Cricut Design Space for my veggies
My Creative Time - Happy Thoughts stamps and dies

card 2
snippets from the snipped drawer
My Creative Time - Happy Thoughts stamps and dies
                                Stitched Sweetheart & XOXO dies


Sunday, August 20, 2023

More Wedding Stuff

Hello crafty friends, I hope you all have had a nice weekend. My heart and prayers go out to those in Hawaii and Canada (and anywhere else) with the raging fires and now to CA with that awful hurricane. The weather is getting pretty scary to say the least! I hope you are safe where ever you are! 

I have done a little digging on the "malicious website" warning that I've been getting on some blogs. Please, if I've told you about me getting this warning for your website, watch this video. It is a safe video per Norton.

https://kinsta.com/blog/deceptive-site-ahead/

Now onto more crafty wedding stuff. I thought I was done, but guess not. The wedding couple came to me less than a month before the wedding to make these favors. I don't like doing things last minute, but here we are. What do you do but just make them, right?! She saw a Pinterest photo and sent it to me for what she wanted. I just designed in their theme. so definitely not my idea. I did 60 wedding favors and 40 thank you cards. I kept the thank you cards very basic and simple. They are much smaller than an A2 card because that is what the couple wanted, 5 x 3.5 when folded. Now, hopefully I am done with wedding stuff! 

Front

Back


I am behind with my commenting, but hopefully I will be by to catch up soon. As always, I sure appreciate when you stop by and visit with me. Hope the sun is shinning where you are and if you need rain, I hope you get a nice gentle soaking rain.  


Hugs,


Card Recipe:. 

Cricut
Cricut Design Space
Ivy file from Etsy

Sunday, July 23, 2023

Sending Love

Hello Crafty Friends, I hope this Sunday finds you all well and staying cool. 

I have a card that never got posted. Not sure why I never posted it. Forgot about it I guess. It is a quite simple card cut on the Cricut and then dressed up with a stamp and sentiment dies. It goes all the way back to Valentine's Day. Yep, you heard that right! That's worse than the late Mother's Day card I posted. LOL Anyway, not much to this one at all. The pattern paper is by Cricut and is adhesive which I stuck to a pink card base. I was trying to mimic the flowers in the paper, didn't do such a great job of that, but I still like the flowers I used. Kept the coloring the same as the paper or tried too anyway. Added my sentiment and called it done. I actually cut this panel on my Cricut from the adhesive paper years ago and just never made it into a card. I guess I finally decided to get it out the leftover or unused box (whichever one wants to call it as it is both) and used it. It's a different card that is for sure, but I think I like it. For something different that is. 


Thank you for stopping by and seeing what I've been up too. It's always a pleasure reading your comments and of course I will be by to see what you've been up to as well. 

Crafty hugs,


Card Recipe:

Cricut/Cricut Design Space

Cricut Adhesive Paper - it came with my Cricut Joy years ago

Penny Black - Blooming Garden stamp set

Spellbinders - S5-443 Cursive Sentiments

Ohuhu Alcohol Markers

Saturday, June 17, 2023

Save the Date and Wedding Invites

Hello friends, I hope your weekend is going well! I want to wish all the men in your life a Happy Father's Day. I will be taking my step father out to eat. I had to laugh at him as when I asked him if he had any plans for Sunday and he said no, so I said that I wanted to take him out to eat. He said, "I will take you out instead!" I had to tell him it was Father's Day and I WAS taking him out. He is so funny. 

Anyway, Dwayne's cousin is getting married and I made their Save the Date cards, the Wedding Invite with the reply card as a gift to them. They wanted an ivy image on a cream background so this is what I came up with. So happy to have this job done as the groom was very picky about fonts! All was designed in my Cricut Design Space studio and then print and cut  out. I think they turned out well, but my photo's don't do them any justice. So they look better in person. I know the ivy looks faded in some areas, but that is the way it was design to look. The couple was happy with everything so I am too. All the Save the Dates went out in January and now the invites are all out as well. 


Thank you for stopping by to see what I've been up to and hopefully I've been by to see what you have been up to as well. If I haven't, I hope to be soon. 

Crafty Hugs,


Card Recipe:

Ivy from Etsy
Designed in Cricut Design Space
Print and Cut using the Cricut

Tuesday, May 9, 2023

Cricut Made Cards

Hello everyone, I hope your week is off to a great start. I'm still busy mowing every day or other day. I have a few things to get planted, so want to get on that here hopefully tomorrow after mowing.

I have two cards that I made using the Cricut. Both cards are plain and simple, so not much to making them. But they work for what they are needed for. It is wedding season, so my first card is a wedding card I made for a wedding Bret went to over in Philadelphia.  Looked so much prettier than the photo's look. I printed my sentiments inside and out as well as cut out the design in the white card. Attached it to mirror holographic paper and placed on black card and then a white card base. 

Sorry for the blurriness of the inside, some days my hands are not steady, but you get the gist.
The wedding heart bells are printed in a pale gray, in person it was much easier to see. 


Next card is a simple "box" of birthday candles birthday card. I think it is cute and will be going to Dwayne's Uncle for his birthday. Again, a print and cut card. I used some old packaging acetate for the window of the candle box. Inside sentiment is fitting as Dwayne's Uncle is in this mid 90's. Hoping his wish comes true! 


As you can see, nothing fancy with these cards and not much to them, but again, they do the job.

We've been having lots of rain come through, thus why all the mowing. Here is a photo of a storm that came through, fortunate for me, I got some light rain from it but the storm part just went all the way around me. And I do mean all the way around me. Front, back and side. Luckily I had already gotten the mowing done. I enjoyed watching those storm clouds though and the darkness sure made the green of the grass and trees look even more vivid. I thought those clouds were beautiful, within safe viewing distant that is! 


That's it from me. I will be trying to make it around to your blogs this week in between mowing, playing ball and other chores. So until next time, enjoy your weather and soak up the sunshine!


Crafty Hugs,


Card Recipe:

Cricut/Design Space
Cricut Holograph Card
Printer
cardstock


Wednesday, March 22, 2023

Funny Masculine Birthday

Happy hump day my crafty friends! Hope your week is going well thus far.

My brother's birthday was yesterday, so this is the card I made for him. It is Pinterest inspired. Just used the print and cut feature of my Cricut for this card. Stacked the whiskey glass 4 times to make it chunky and pop up. Hard to see because I did black on black, but there is a postage mat that the whiskey glass and sentiment is sitting on and that is popped up on foam tape. 


I found the inside sentiment online and thought it was perfect. Funny thing is 
my brother is 10 years younger than I am.  Still had to rib him about soon becoming
a senior. LOL He has two more years to go before officially being a senior, but hey 
who's counting?! Surely not me! LOL Oh to be 53 again, right?! 


So not much to this card, but I do like the way it turned out. Looks better in person though. Easter is rapidly approaching fast!  Until next time....


Crafty hugs,


Card Recipe:

Cricut Design Space
My Creative Time Postage Dies
Dollar Tree foam tape
Paper Studio (Hobby Lobby) heavy weight black card for my card base
Canon Printer

Tuesday, January 24, 2023

CAS Masculine Birthday Card

Happy Tuesday everyone. I hope your week is going well. 

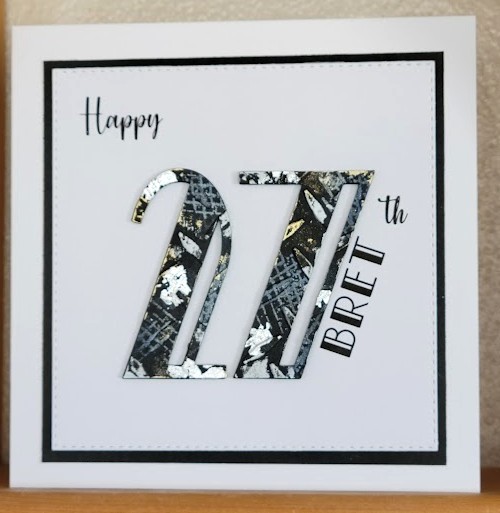
I have been watching a lot of Chrissie Stokes videos and just love her style. Plus she is pretty funny to boot! She had enabled me into buying some gilding wax and gilding flakes. I have all the mica powders Bret gotten for me last year so used one of the colors for the first time on this card, along with the gilding flakes and wax. I cased her card which you can see here. I thought this design would make for a great masculine birthday card. Since it is Bret's birthday today, I decided to try out all these materials for his card. I do love the way it turned out even though I'm not super great with using these mixed media materials. It was fun playing around with them though and I definitely plan on playing with them more on future cards. 
Since I was going to be hand delivering the card, I went with a 5 1/2" square card. I also stacked the numbers 4 thick and layered the mat on foam tape. I am sorry for the blurriness, I was a bit shaky taking the photos and for the life of me, couldn't get a picture that wasn't blurry! Plus I think the silver flakes was messing with the camera as well. I embossed my 2 & 7 with the diamond plate embossing folder, stamped with versa mark and added blue mica powder on top of the versa mark. Added glue and silver gilding flakes, then added some gold and silver gilding wax as well, not necessarily in the order I listed. 


As always, thank you for stopping by and visiting with me as I know time is precious. I really want to say I'm sorry if I haven't visited you. I am trying to get to people, but without getting notifications anymore I tend to miss some of you. Again, I'm sorry...I try to come around as soon as I think about someone I may have missed. So unless you have a "follow it" tag for me to join, I don't get notified of when you post. 

Crafty hugs,


Card Recipe:

Numbers. Bret's name - Cricut Art Deco font

Happy, "th" - Agleisya Font using Print & Cut

Canon Printer

Arteza French Blue mica powder (Amazon)

Kinno Imitation Silver leaf flakes (Amazon)

Pebeo Gilding Wax - Silver and Empire Gold (Amazon)

Maymay Made It - Patina stamp set 

Cuddlebug Diamond Plate embossing folder

My Creative Time - Stitched Square Dies


Tuesday, December 6, 2022

Mini Album-Picture Heavy!

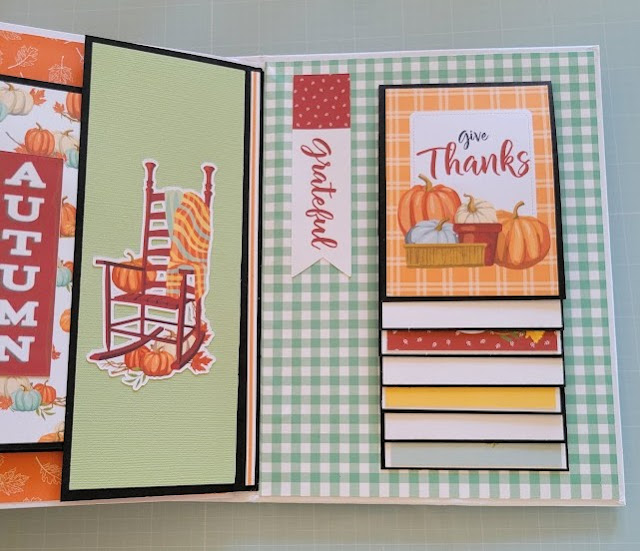
Hello friends, it's a busy time of year, so I will make this as brief as possible. I made this non traditional mini album for my friend whose daughter got married Nov. of 2022. They had a non traditional wedding, thus why I went with a non traditional album. So lots of flip outs, flip ups, waterfalls, pockets, etc...All the pages flip up or out and this mini album holds around 50 photos. I used a digital collection from Echo Park called Hello Autumn. The physical paper comes with a sticker sheet, so does the digital collection, only they aren't stickers of course. So I pulled images over and put a white offset around some of them and cut them out on my Cricut. This time I used a premade photo album and just added extra pages to it. 

The Cover

                                       Inside of the cover and first page that pulls for a triple panel on each side.  I put two horizontal waterfalls that holds 3 x 4 photos. So 14 photos for the inside cover. 


This page pulls out in a triple as you see in the photo below this one. It was just a double pull out and I added an additional panel. I put a pocket in the center panel with a little booklet that will hold 3 3x4 photos. So 9 photos for this part. 


      This flip up I added, the book didn't have one, so I added it. I wanted extra room for photos.


   This is a little half page I added to magnetic down the waterfall on the back inside cover. 


And that is my mini album, I hope you enjoyed it as it was a labor of love! My friend loved it and I was a happy camper that she did. I had lots of fun making it. 

As always, thank you for taking time from your busy schedule, especially this busy time of year, to visit me and seeing what I'm up to. I sure appreciate it and enjoy your comments!

Crafty Hugs,


Card Recipe:

Echo Park Hello Autumn digital collection
49th and Market mini album 
Cricut Design Space
Cannon Printer
White cardstock

Thursday, October 20, 2022

Golf Centerpieces for High School Banquet

Hello crafty friends, I'm back with the golf centerpieces that I made for my nephew's golf banquet. I'm sorry but I can't edit my photos as iPiccy isn't supported on Windows anymore. I guess I will have to have Bret check things out for me. Until then, you get the unedited versions of my photos. Sorry about that!


My SIL sent me a photo from Pinterest of what she wanted and I made it with my own tweaks. This is the container my SIL got and I designed and put the vinyl on it. My brother wanted each senior's name to be added on. He bugged my SIL until she agreed to let each senior take a centerpiece home with them. lol 


These are the flags I made. I used stiff felt that I cut on my Cricut and vinyl along with a square dowel rod. The is a golf flag on each side of the dowel rod so it can be seen from each side of the table. I just used hot glue to glue them to the dowel rod and then glue the point of each flag together. 


My SIL put them together, she glued the flag dowel rod in then placed stones at the bottom, then the moss and the golf balls.


In the end, they asked me to make 11 of them, The kids and parents were very pleased with them and that's always nice to know. I think they turned out nice too. 


And that is it. As always thanks for taking time from your busy schedule to see what I'm up to once again.  I will be by to visit you soon too! 


Crafty Hugs,


Card Recipe:

Stiff felt, dowel rods, and iron on vinyl are from Hobby Lobby

Vinyl on the vases is from my stash, just used regular vinyl for those

Cricut and Design Space to design and cut the vinyl