Showing posts with label Maymay Made It. Show all posts

Monday, August 28, 2023

More Christmas Cards

Hello crafty friends, I hope your new week is off to a great start! 

I have made some more Christmas cards for my stash, although I've got a long way to go. This is a simple card, just stamped my image, rounded the edges over and glued on to an embossed layer. Before I embossed it with the embossing folder, I embossed my sentiments with gold embossing power. It was hard to get a good photo especially of the gold embossing. And that is it, told you it was a simple one! I made 8 of these for my stash.  


Thanks for taking time from your busy schedule to visit with me, your comments are always so sweet. If I haven't been by to see you and comment, I should be soon. 

Crafty hugs,


Card Recipe:

Maymay Made It stamp set - Just Believe
Wow - gold embossing powder
SU 3D textured embossing folder
Crafter's Companion box maker scoreboard - to make my rounded edges on the image strip
Onyx Black ink from Versafine

Friday, August 4, 2023

Christmas Cards....finally!

Hello crafty friends, I was without internet for several days. Bret was trimming the bushes last Sunday and accidently cut into the internet cable. Oops! I'm back up and running now though, so all is good. Now I'm trying to play catch up, as you know I tend to get behind on my own without any help of losing Internet! 

Since I didn't have internet or TV, (I have YouTube TV) I decided to get a start on my Christmas cards....finally! Have a lot more to go obviously but at least I finally started. LOL I had colored 6 of these Penny Black Snowy the Snowman images eons ago and threw them in my leftover's box. Well, I thought it was high time to use them on a card! I dug into the backgrounds box and found smooshed backgrounds to match each of the snowman I colored, how fun that I had little pieces that matched each snowman! I am tickled pink on how these came out. I was inspired by Pinterest and this is my take on it. I let some of the scarves hang over and some not, all the pompoms hang out over though. Some different backgrounds as well. My panels are popped up from the background. I hope these bring a smile to your face like they did mine!


I tried catching up with my commenting yesterday after the service guy was here. So if I missed you, don't worry I will be by to visit! Thanks for stopping by to see what I've been up to with no Internet. It's amazing at what all you can actually get done when you aren't "wasting" time on the Internet. LOL But it is oh so fun to be on it, isn't it?! 

Crafty hugs,


Card Recipe:

Penny Black - Snowy the Snowman

My Creative Time - Stitched "Capture" Frame w/arrow die, Chalkboard Christmas (sentiment/Santa & reindeer)

CTMH - Frosted D1562

Maymay Made It - Fond Noel (pine boughs), Just Believe (sentiment), Ornamental Greetings (snowflakes)

Cardz TV - Merry Everything (sentiment)

Ohuhu Alcohol Markers

Distress Oxide smooshed backgrounds

Stampendous Frantage


Saturday, June 24, 2023

A Lou Collins Mixed Media Case-sort of....

Hello crafty friends, I hope your weekend is off to a great start. We finally got some much needed rain. So happy about that.

I wanted to try a mixed media card following Lou Collin's tutorial and I needed a masculine birthday card. I'm not great with mixed media, but it sure was fun playing around and I'm pleased with my results for the most part. I'd tell how to make it, but most of you already know how most likely. Since I was hand delivering this card, I went ahead and used lots of foam tape. I should have used some white paint in my embossing paste, I didn't realize it was so transparent. I think I've only ever used it once and that was years and years ago. Thankfully it was still good, it just is hard to see in the photo. In real life, it shows up better. I do wish I would have left the sentiment all black, IRL it shows up better too.


I also have a giveaway that I'd like to send someone. 
I accidently bought two of these stamp sets, so please let me know if you would like to be entered into a drawing for this stamp set. It is a great stamp set for mixed media. I'd love to send it to someone if anyone wants it. This is what the stamp set looks like:


That's it from me, thanks for stopping by and seeing what I've been up to. I will be around to see you soon as well. 

Crafty hugs, 


Card Recipe:

2 Creative Memories Hexagon Punches-each punch has two different sizes of hexi's

Waffle Flower A2 dies to cut my panel down

Spellbinders s5-443 sentiment die set

My Creative Time Number Fun Dies & Add On, Type Background Stamp set

Maymay Made It Patina Stamp Set

Liquitext Flexible Modeling Paste-Gel medium from Hobby Lobby

Tim Holtz Mini Stencil THMS094

TH Stencil Burlap

Distress Oxides in Iced Spruce, Black Soot

Distress Inks in  Rusty Hinge, Dried Marigold

Hero Arts Ink in Black, Soft Granite
 
Gold and Silver gilding wax

Dollar Tree for the foam tape

Iridescent Watercolor Ink from an old Hero Art's Kit


Thursday, April 6, 2023

Just as He Said...

Hello my crafty friends, I hope the weather has sprung to spring where you are. It certainly has here. I'm mowing every other day now. And of course puppy sitting and playing ball. Might be able to open the pool earlier than normal. We shall see. Anyway, this is keeping me busy, so I am behind on my commenting once again. So please bear with me while I try and catch up as best as I can. 

I have Easter cards for today. A sweet friend from CA, who is no longer with us anymore, sent me lots of embossed backgrounds that she embossed using some Anna Griffin embossing folders. So I decided it was time to use them as I've had them for years and years. I really miss my friend, but I know she is in a better place just like Dwayne. Some embossing folders, I used the embossed side, other's I used the debossed side. I saw this cross die (NBUS) and I fell in love with it. I didn't have any cross dies and this one was on sale, half off I think or more, so I snagged it. I think it is gorgeous, a tiny bit  fiddly, but well worth it. I made a bunch of these Easter cards, don't remember how many exactly, but around 10 I think. I love how simple they are, but to the point of what Easter is really all about. They also looked much better in person than they do in these photos for some reason. 

Edited to add: I'm taking this over to the NBUS Challenge since the cross was a NBUS

 
All the outsides look like this, except for color and the embossing folder.

Insides all were like this, although Jesus looks very dark in my photo,
 but in real life he wasn't.

Following photos showing the different embossing folders I used. 


Thank you for stopping by to see what I'm up to in my little world. I'm sorry once again for being behind in commenting. I hope to start commenting tomorrow. Once spring has past, them mowing will slow down to just twice a week, but right now, I have to mow constantly or else I'm making hay. Not fun to make hay. LOL  I hope you are enjoying lovely weather as well!!! 

Crafty hugs,


Card Recipe:

Embossing folders - Anna Griffin

Oval scallop - My Creative Die Scallop Ovals

Cross - Spellbinders

Outside sentiment, Jesus, inside sentiment - Maymay Made It "He's Alive" stamp set

Happy Easter - Close to my Heart "Just to Say" Cricut Collection

Cross colors are snippets from my snippets bin

Tuesday, January 24, 2023

CAS Masculine Birthday Card

Happy Tuesday everyone. I hope your week is going well. 

I have been watching a lot of Chrissie Stokes videos and just love her style. Plus she is pretty funny to boot! She had enabled me into buying some gilding wax and gilding flakes. I have all the mica powders Bret gotten for me last year so used one of the colors for the first time on this card, along with the gilding flakes and wax. I cased her card which you can see here. I thought this design would make for a great masculine birthday card. Since it is Bret's birthday today, I decided to try out all these materials for his card. I do love the way it turned out even though I'm not super great with using these mixed media materials. It was fun playing around with them though and I definitely plan on playing with them more on future cards. 

Since I was going to be hand delivering the card, I went with a 5 1/2" square card. I also stacked the numbers 4 thick and layered the mat on foam tape. I am sorry for the blurriness, I was a bit shaky taking the photos and for the life of me, couldn't get a picture that wasn't blurry! Plus I think the silver flakes was messing with the camera as well. I embossed my 2 & 7 with the diamond plate embossing folder, stamped with versa mark and added blue mica powder on top of the versa mark. Added glue and silver gilding flakes, then added some gold and silver gilding wax as well, not necessarily in the order I listed. 


As always, thank you for stopping by and visiting with me as I know time is precious. I really want to say I'm sorry if I haven't visited you. I am trying to get to people, but without getting notifications anymore I tend to miss some of you. Again, I'm sorry...I try to come around as soon as I think about someone I may have missed. So unless you have a "follow it" tag for me to join, I don't get notified of when you post. 

Crafty hugs,


Card Recipe:

Numbers. Bret's name - Cricut Art Deco font

Happy, "th" - Agleisya Font using Print & Cut

Canon Printer

Arteza French Blue mica powder (Amazon)

Kinno Imitation Silver leaf flakes (Amazon)

Pebeo Gilding Wax - Silver and Empire Gold (Amazon)

Maymay Made It - Patina stamp set 

Cuddlebug Diamond Plate embossing folder

My Creative Time - Stitched Square Dies


Sunday, November 27, 2022

Fall/Thanksgiving Cards

Hello crafty friends, I hope you all had a wonderful Thanksgiving! Bret and I had a very nice one with my brother and his family.

I have some Fall/Thanksgiving cards to share today. Another new craft supply I had gotten was a Concord & 9h turnabout stencil. I really loved playing with it and this is the results from my play. 


Close up of two


Thanks for taking time from your busy schedule to visit my blog, I hope to be by your blog soon as well. I'm not getting the notifications when you post like I used to get, so if I am missing you, I'm sorry. I am finding that I have to go through the comments you leave me to come to visit you.  So if anyone has an tips on how else to do this, please let me know. 


Crafty Hugs,


Card Recipe:

Concord & 9th Turnabout "Autumn Hues" Stencil

ARTpolorations Mini Stencil "Leaf Prints mini"

My Creative Time "A Thankful Heart" Stamp and Dies: die cut leaves, Happy THANKS giving

My Creative Time "Piles of Smiles": Maple die cut leaves, Autumn Greetings, Hello Fall

MayMay Made It "Fall Stitched Up" Stamp Set: Truly Grateful, Wishing you a beautiful Season, Autumn is my favorite color

Hero Arts "Happy Thanksgiving": die cut thanks, giving

Dress My Craft "Rectangle Die set 

Hero Arts ink cubes: Soft Cantaloupe, Red Royal, Butter Bar, Mint Julep, Pastel Mint, Tide Pool, Field Greens, Forever Green

Thursday, November 17, 2022

More Christmas Cards

Hello friends, hope everyone is doing well and if it is snowy and cold where you are, stay warm. 

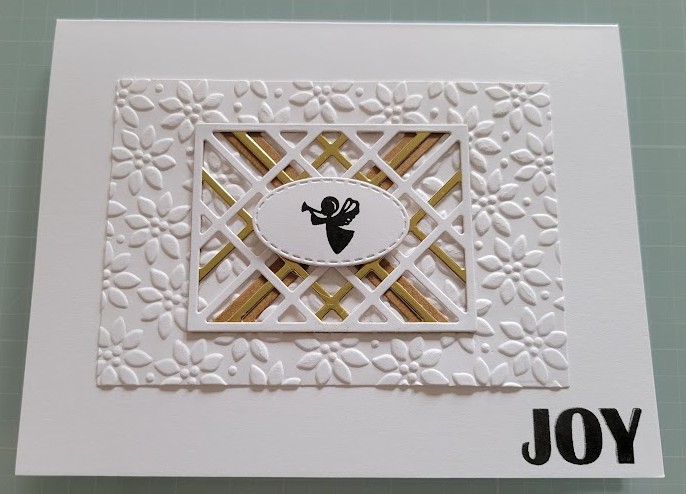
I'm back to share a few more Christmas cards. I had seen Brenda over at Inkspired to Stamp use this die a while back and just had to order it for myself. I don't buy a lot of crafty goodies anymore, but there have been a few things I've just had to have. All these cards are the same except for the center image as you can see. I had fun making these and love how they came out. My little images were the perfect size to place on this layer die without covering up the beauty of it. Love the embossing too. When I think of Christmas, I think of love, peace and joy...so those are the sentiments I used. As you can see, I made 8 of them. I do wish I had used kraft, gold mirror and red cardstock for my plaid dies, but still like the way they turned out. I might make more using that color combo to add to the stash for next year. We will see.  They look so much prettier in real life than they do in the photo's. 


Thanks for taking time from  your busy schedule to come and visit me, I appreciate you and your comments! 

Crafty hugs,


Card Recipe:

Spellbinders Kaleidoscope Plaid die set
My Creative Time Scalloped Stitched Oval Dies
Maymay Made It Christmas Tag It for the little images
Altenew Festive Poinsettia for the sentiments
SU embossing folder
Versafine Onyx Black ink
white/kraft and gold mirror cardstock-snippets from my snippet drawer
Neenah 110lb cardstock for card base

Tuesday, April 26, 2022

Some Easter Cards

Hello crafty friends, I hope your week has been going well. Not much happening around here. Doctor put me back on my Lupus meds as my numbers were high. Proteins a little high in my urine as well, but we are just going to keep an eye on that for now. Vitamin D is low too, that surprised me, so will be doing meds for that once a week. So considering I've been managing without the Lupus meds for 6 1/2 years, I figured it could have been way worse. So I'm thankful I managed as well as I have. My Doctor was surprised that I managed as well as I did too. But sometimes, that is your only choice and you just survive as best as you can.

I have some Easter cards to share today. I got a few made and sent out before Easter. I hope you all had a great Easter, we did here. 


My first card I saw on Pinterest, I didn't have the dies they used, so I went to my Cricut Machine and Design Space to get my cuts of a cross and palm leaves. The oval and sentiment strip are from dies I have. Hard to see, but I also used an embossing folder for the background mat. I cut many crosses, stacking about three on top of each other and then placing the wood grain paper cross on top. Inked my palm leaves with DOI's. I am pleased with how this card came out, similar to the one on Pinterest, but different a bit too.


I used my left one of the over die cut piece to stencil a palm leaf inside my card. 


Same with this card, saw it on Pinterest. Same as the first card, I didn't have any bunny dies, so went to my Cricut and Design Space to do some print and cut bunnies. Couldn't find any pattern paper to use, so thus why I picked some patterns and did the print and cut. I need to calibrate my machine though! Die cut my squares, placing my bunnies on them. Added some sequins, don't think the one on Pinterest had sequins. So again, similar, but different. 


This card uses snippets and a little washi flower die cut that a sweet friend sent me a bunch of. Thank you sweet friend, you know who you are! Simple, layered, but sweet I thought. I followed a sketch from Cardz TV.


Another sweet friend sent me this little bunny, two of them actually. Thank you sweet friend, you know who you are too! I used all snippets on this one too as well as following another Cardz TV sketch. The purple piece is an alcohol piece I found in my background stash. The wreath was cut using a friend's SU die and I used Brusho's on it. I did many of the wreaths that day we got together, which was quite a while ago! So I just have them in my bits and bob box to use. 


The sweet friend who gave me the sweet bunnies, also gave me the piece of wood that I've hoarded for quite a while. But figured it wasn't doing anyone any good by keeping it in my stash and so I finally used it. I have a tiny square piece left to use yet. Again, thank you sweet friend....you know who you are. 


And that is it! Thank you for stopping by and visiting with me a spell, I know it is busy for everyone. Mowing is keeping me busy as well, although I wish the weather would just stay warm. The next three days is supposed to feel like winter with some areas higher up maybe seeing some snow.  We will see rain with maybe a snowflake or two...what's new there?!What the heck, it is almost May?!!! Anyway, your comments always bring sunshine and joy to my days and I thank you for taking the time to leave one. If I haven't been by to see you, I will be soon. 

Crafty hugs, 


Card Recipe:

Cricut
My Creative Time
Stamping Up
Maymay Made It
Distress Oxide Inks
Snippets
Brusho's
Alcohol Inks

Monday, January 31, 2022

Rudolph Days

Hello my crafty friends, I'm slipping in at the last minute to play along over at the Rudolph challenge. It closes tonight, so I am cutting it short! It is also my first project of 2022. 

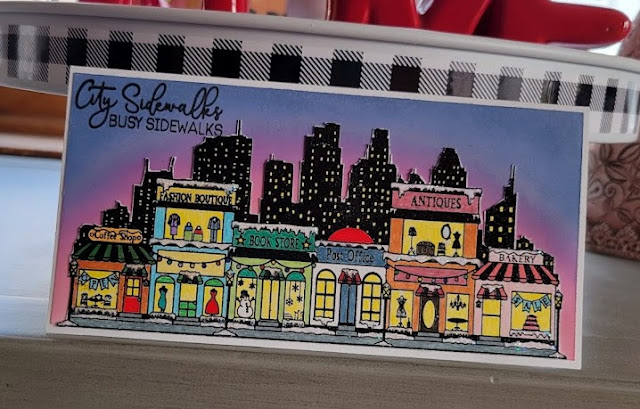
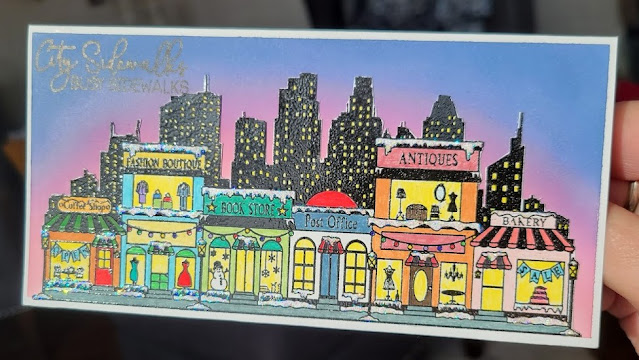
I made a mini slimline card, it turned out to be a "make a fuss" card and took longer to make than I would have liked. I will be using this image again because I love it, but won't be coloring it all in again. lol It's a larger stamp, but all the pieces are tiny to color. So my little scene is of a town in the "Burbs", with the big city behind it at dusk. I didn't get my sky right, but I can live with it and will try a dusk sky again sometime. All my little stores are open, lights on and ready for Christmas shoppers, even the Post Office is open for those last minute packages that need to get sent out. lol Wish that happened in real life! I embossed with black embossing powder and then colored in with just regular markers. Fussy cut out my image and laid it on my DIO background. I wanted to put faux snow on the snow areas, but they are tiny and the tip of the snow bottle just wasn't fine enough-plus the snow is thick. So I used Stickles instead. Tried getting a photo of the sparkle, but it didn't really turned out in the second photo. I did enjoy the mini slimline size card, so definitely want to try making some more again. Never made mini slimline cards before, just the regular slimline, and that was years ago.


Thanks so much for stopping by and visiting with me again. I so appreciate you all and your comments brings so much joy to me. If I haven't been by to see you, I hope to be by soon. 

I got my first shingles shot and boy did it kick my butt! Even the Covid vaccines didn't bother me like this shingles shot did. It kicked my butt for several days, stirring up my Lupus big time. I hope the second one goes better! Bret is getting his things declutter and packed. Moving furniture on Wednesday! I am looking forward to seeing his "new to him" home. I am hoping to be able to share some photos soon. 

Stay warm if it is cold in your neck of the woods and I pray everyone is staying well.

Crafty Hugs,


Card Recipe:

City Sidewalks, Busy Sidewalks Stamp Set-Maymay Made It
Cricut Markers
SU Black Embossing Powder
Stickles
Distressed Ink Oxides


Friday, October 29, 2021

Rudolph Challenge

Hello my crafty friends, I sure hope the sun is shinning where you are. It is a dark, rain dumping, extremely windy day here. Very raw out. Yesterday was so beautiful, sunny and not warm, but not cool either. Just a hint of crisp in the air. I guess it was the sun that made it feel so nice with temps in the low to mid 60's. 

I took a pause from Christmas gift making to make a card for the Rudolph Challenge. I haven't played in so long, I don't play much in challenges because mostly I forget about them and then they are over. lol I've tried writing down the challenge and date to close, but then forget I wrote it down. Anyone else as bad as me?! No, ok.....even Bret is worried about me. haha. 

Maureen is honoring Kath, a blogger who recently passed away by adding a twist of paper piecing since Kath paper pieced a lot. So if you do paper piecing, she had an extra gift in honor of Kath. I'm not playing for the price, God knows I have enough crafty goodness to last me forever. I love how paper piecing looks, but rarely do it so I thought this was a great time to make a Christmas paper pieced card. As usual, it didn't come out as well as it did in my head, and while I don't love it, I don't hate this card either. But I do have a lot of ink where it doesn't belong! Rudolph's face, on the white part of my card, etc. I think it came from the stamped glittered cardstock, the ink had a hard time drying on it. I should have used Stazon, hindsight! 


So while this card isn't perfect and didn't turn out like I "saw" it in my head, I think it is still cute. So I think this will be a grandchild card. lol They don't notice your mistakes! I also am going to enter this into the Snippets Playground (Ruby's Memory) and NBUS challenges. 

Thank you for stopping by today and visiting with me. Your comments always bring rays of sunshine to my day. If I haven't been by to visit you,  I should be soon. 

Crafty hugs,


Card Recipe:

Maymay Made It-Santa's Stuck, Again! stamp set NBUS
AliExpress-House Dies NBUS
Dress My Craft-Rectangle dies
Snippets
Viva Pearl Pen in White
Red Stickles
Cheap Dollar Tree white chalk marker for the "grout" of the chimney

Tuesday, March 23, 2021

Twofer Challenge

Hello my crafty friends, I hope you have been having as nice weather as I am having. Rain tomorrow though, but I'm ok with that since the temps are staying up too. 

I'm skating in by the skin of my teeth here for the Twofer Challenge which is "your choice". I must say I thought it was even harder not having a prompt word. lol I guess I need to be told what to do! So here are my Twofer's. Simple, quick and easy. I used the palm branches on both of my cards, but thought they looked like feather's too. So that is how I went with it. I have to apologize for the photo's looking so blurry. Not sure why as my original's aren't. Must have happened in the photo editing. 


                                     This is a one layer card, I don't do one layer very often!


So that's it. Just two very simple cards. I did try to make the feather look like it was floating downward, but didn't succeed with that. lol Maybe it doesn't make as good of a feather as I thought! Or maybe, probably, it is human error. 

As always I thank you for taking time from your busy schedule to stop by and visit with me a spell. I always enjoy your visit and they always bring much sunshine to my life.

Crafty hugs,


Card Recipe:
Jesus, palm branches & Sentiment: Maymay Made It Stamps "He's Alive"
Wow Platinum embossing powder
Thinking of you: Maymay Made It " From All of Us"
Black Paper from Paper Studio, Hobby Lobby


Sunday, February 7, 2021

CAS Christmas Card

Hello  my crafty friends, I hope you are all doing well. We got some more snow, but it was a very wet snow, so it made the trees look so pretty and it melted pretty quickly on the roads/driveways/walkways. My kind of snow! Friday I got my first dose of the vaccine for Covid. No side effects except it felt like I had a bruise where they injected me but that went away fairly quickly, by the next day. And I didn't notice it unless I touched that area. So all in all it went very well. I know the vaccine isn't for everyone, especially people who have issues with being allergic to a lot of meds and such. But for me, I don't experience any allergies to meds and such, so it was a no brainer. I think those of us who don't have allergy related issues need to get the vaccine for those who do have allergies. Once we can get herd immunity across the world that should help those who can't get the vaccine because we won't be spreading the virus anymore....at least that is my hope and right now, hope is all we got along with the Lord. 

I decided to play in the CAS Christmas Card Challenge for this month to help build my stash. The theme for this month is dogs or cats. Well, I am a dog lover for sure. Not to say I don't like cats, but not as much as a dog. So I went with a dog. Pretty simple card, so not much to tell you. I just stamped my images (dog and Santa hat on watercolor snippet paper and home, trees and Santa/reindeer on a snippet of white) cut out with a rectangular die to the size I was looking for, and popped my doggy up on a pop dot on his bottom and glued the top of his head to my scene because of the layers. I thought this turned out pretty cute and am pleased for once! lol So I made three of them to add to my stash. Edited to add: I am going to play at the Snippet's Playground in memory of Ruby.


Close up of the stickles

As always I thank you for taking time from your busy day to stop by and visit with me for a spell. I always appreciate your visits as well as your comments, they always put a dance in my step! I will be by to visit you as well. Take care, stay safe and healthy!  

Crafty hugs,


Card Recipe:
Maymay Made It Stamp set: "Dash Away" NBUS
My Creative Time Stamp set: "More Stitched Rectangular Dies"
                                                " Christmas Doggy and More" stamp and die set NBUS
Arteza Real Brush Markers: red and a darker red for shading
Zig Clean Color Brush Marker: light gray
Stickles
Ranger Clear embossing powder: for my doggy and his Santa hat
watercolor paper snippet
Black cardstock snippet
Red cardstock snippet