Showing posts with label Martha Steward. Show all posts

Sunday, August 8, 2021

Buzzin' By....

Hello my crafty friends, I hope your weekend was a good one. Bret had a little get away weekend, so I was on my own with the pups for the first time since this whole ordeal with my knee. We did well and it sure helped that I could put some weight on my leg. Of course the transport chair always comes in handy for letting them out and getting my simple meals. 

 Back with two bee cards made back in early summer, still using the digital papers I printed out a few years ago. Such pretty papers, so using up every piece I can, these are all snippets, except for the card bases. Stamped and colored my bee's and die cut some cute flowers to use. I even dug out some border punches to use which I haven't used in a long time. Love them, but you know how you go in spurts with crafty supplies!. What's old is new again! lol 


Card Recipe:

Nitwit Digital Collection:  Bee-lightful for the digital paper
My Creative Time: for the bees and flowers, sentiment mat and I think the sentiment
Martha Steward border heart punch
Fiskars border scallop punch
Spellbinders Hemline Stitch circle die

Monday, October 26, 2020

A Few Challenges

Hello my crafty friends, hope your week is starting out well. It's been foggy & gloomy here with rain since Sunday, but we need this rain, so I won't complain. COVID numbers are going up here and I'm not liking that. I so wish everyone would just wear their masks. Gatherings are a problem too, but I feel it can be done safely if people just adhere to the guidelines of wearing masks inside or stay outside and social distance. Oh well, my complaining is not going to change anything, but common sense would go a long way with this pandemic.

I decided I would join in a few challenges for once. Yes, I know shocking! But was able to cover all three challenges with one card. Then it is back to working on Christmas projects. I'm not exactly thrilled with this card, but not totally unhappy with it either. I think the metallic mirror paper is throwing me off. Hard to get a photo with shiny paper too. So I laid it down to take the photo. Still got a reflection at the bottom. Don't like the black sentiment banner either, but though it would help tone down the shine a little. It didn't and I don't like it. Didn't like white either, maybe I should try pink or green like my greenery on my poinsettia. What do y'all think? Anyway here is my card: 


The challenges:
Rudolph Challenge-Christmas card challenge from the 25th of each month to the end of each month. 

CAS(E) this Sketch-your interpretation of their sketch


Let's Squash It!-A new challenge where you are to use your embossing folders. They have prompts for you to follow which was a geometric folder and metallic card stock/metal. 


Thank you for taking time out of your busy schedule to come and visit with me. Sorry we had such gloomy weather. Your comments mean the world to me and bring so much brightness to my life. If I haven't been by to visit you, please know I am making my rounds and should be there soon. Stay safe, stay healthy and enjoy each other. 


Crafty hugs, 


Card Recipe:

Gina Marie die: for the woody wreath cut at a friend's house-cut out of snippet's of kraft                  cardstock, inked with DO Walnut Stain, Gathered Twigs, Delicata Gold and Rose Gold. 
Amazon: for my snippet of Mirror Paper
Sunny Studio's: for my poinsettia-out of my unused box-I need a clever name for this box, lol
Martha Steward Branch Punch: cut out of some mixed media paper that I had splattered w/ink
My Creative Time: for the banner and sentiment
We Are Memories 3D embossing folder

Thursday, July 16, 2020

Butterflies

Hello my crafty friends, I can't believe it is the ending of another week! These weeks just zoom by me and I don't even know what day it is half the time. I hope you all are staying cool where you are. Not much pool time this week, it's been a busy one. My brother and sister-in-law invited me to go on vacation with them and my nephews to the Outer Banks. I couldn't say no could I?! Now, I know.....NC is a hot spot right now. But we are going to be staying in a private house on a private beach. No crowds or anything. Will be cooking our own food and the only time we won't is when my brother goes and gets seafood to make for us. We all will have our masks as well for if we do need to go out for anything. I will also quarantine 14 days as per my state requires when going to another state and coming back. So we leave at 4 am this Saturday. Dropping my suitcase off tomorrow at my brother's house as he wants to be packed up ahead of time. Bret will be holding down the fort and the dogs. He was invited too, but with three dogs, well...someone had to stay home with them. He will be going to his boss's cabin in early Aug. and maybe to the beach later in Aug. 


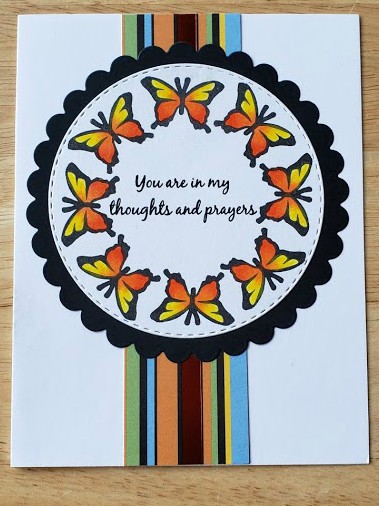
So wanted to try and get my Twofer cards made and since I needed to send a card out in the mail before I left, so decided to make it a butterfly card to fit the challenge. So here are my two butterfly cards. Simple and to the point. lol 


Let's take a closer look shall we? 
Using my Gina K stencil template to make a wreath, I used this Martha Steward butterfly stamp. It is a punch that stores a stamp too. So you can stamp and punch it out. I didn't use the punch, just the stamp. I've never used the stamps before...so does that make it a NBUS??? Then I took my Prisma colored pencils and colored each butterfly. The striped piece of paper is a snippet. Very simple card.

 This one was a little more involved for me. I didn't do such a great job, but that's ok as I think it still looks ok. I had three of those MS butterfly punch/stamps so used all three on this card. I stamped them down the side of the card (Pinterest inspired), but in a bit, then cut around them to show the inside of the card. Colored my butterflies in purple with my Prisma pencils. I went into my purple snippets and found this piece of paper, it was double sided, so I turned it over to the solid side for under the butterflies (inside of the card) and kept the "stripes" for the front of the card. Added a little thin black piece of cardstock along both piece of paper, can't it inside. Stamped my sentiment and colored it with the same pencils. To much purple???? It looks much better in person than in this photo for some reason. 

I thank you for taking time out of your busy schedule to visit me. I know it's been hot and I appreciate your visits in spite of the heat. Your comments bring much joy and sunshine to y life and I so appreciate then and you! I will be commenting yet tomorrow and then I will be behind on my commenting since I will be gone for a week. I might try and do some commenting on my phone, but usually that frustrates me and I give up. lol Anyway, I will come back and probably have to re cope from being away....aka, let my swollen feet go down and I will most likely have to mow. Will see if Bret does it while I'm gone. I'm sure I will get many texts from him like I usually do with questions. lol Have a wonderful weekend my crafty friends and I will "see" you in a week! 

Challenges:
NBUS Challenge, if my butterfly stamps are considered nbus

Crafty hugs,


Card Recipe:

Wreath Butterfly card:
Martha Steward butterfly stamp
My Creative Time for the circle and scalloped circles
Cardz TV Stamp set for the sentiment
Prisma Colored Pencils
snippet paper

Purple Butterfly card:
Martha Steward butterfly stamps
My Creative Time stamps for the sentiment
Prisma Colored Pencils
snippet paper


Sunday, February 16, 2020

CAS Watercolour Card Challenge

Hello my crafty friends, I hope this Sunday finds you all well. I had a little time so wanted to make a couple cards for some challenges. So will start with the CAS Watercolour Challenge and their prompt is black and red. One can never go wrong with the color combo of black and red in my own humble opinion-not in cards or clothing. It is a classic, elegant and sexy (in a classy way) color combo to me. Well I didn't have a clue as to what I wanted to do since Valentine's Day is over. I know black and red isn't just for Valentine's but the old brain just wasn't thinking! I don't think well on demand anyway. lol But this is what I came up with. Simple and CAS, nothing special. I didn't add a sentiment because I don't know if I will use this card for a birthday card, anniversary card or a Valentine card. Hard to say what it will be used for! But when I decide I will place a banner across the flower stems with a sentiment. I used Brusho's in Rose Red, I was a little disappointed in it as I was hoping some other flecks of color would have been in it, but there wasn't. It's a beautiful red or pink shade, I just thought, like a lot of other Brusho's, it would have has other flecks of color. Oh well, I still love the results. The light pink flower was made from the paper that I used to soak up what was left of the Rose Red on my mat. I hope it is ok that there is pink on the card too. I will be back another day to enter another challenge. 

As always the full recipe of supplies will be listed down below. I thank you for taking time out of your busy day and visiting with me a spell. I am behind in commenting once again, but hope to be by your blog very soon. 


Crafty hugs,


Card Recipe:

flower die-Simon Says
rose red Brusho
Martha Steward lace punch
Bristol Mixed Media paper
black card base
cheap white card stock from who knows where

Friday, March 25, 2016

You Fill My Heart with Sunshine!

Hello my crafty friends, I hope today finds you all well and enjoying life. It's my turn to post over at Cardz TV Gallery today. Since Easter is this weekend I needed to decide what I was doing for the grands this year. Nothing like waiting until the last minute, but Easter is so early this year that it just snuck up on me. I saw this tutorial over at Split Coast Stampers and decided that I would make these for the grands. They are so easy to make and pretty fast as well!! I made 6 of them, but only showing you one. They are all the same except for the colors and papers.  Don't be fooled, these baskets are a pretty good size and will hold a lot. I have stuffed wadded up paper in the bottom of mine to take up space. If I need the space, I will just take it out. My butterfly doesn't show up to good, no natural light when I took the picture. Sorry about that. This is about the only time I can seem to get crafty, when I need something for the grands. And of course spring is here and I am starting to mow now too. Spring and summer keeps me busy. So I'm not very crafty at the moment, hopefully when I get through this year of "firsts" since my husband passed, I will get in the mood to be a little more crafty. I want to make the grands an album of them with their Papaw here soon, so I hope my mojo comes back some time within the year. Recipe at the bottom of post.

As always thanks for taking time out of your day to visit little ole me. I sure do appreciate your comments as they always put a smile on my face and nowadays, I can always use a smile. Crafty hugs, Brenda


Recipe:
Cardz TV Stamps-It's All Good and Easter Blessings
My Creative Time-Bunch of Stitched Dolly Dies
                              Pretty Butterflies & Dragonfly Dies
                              Stitched Round Tab, Arrow & Tag Dies
Martha Steward-punch for the basket handle-sorry don't know the name
                         -butterfly punch
Stampin' Up-Bow punch
Homemade enamel dots

Wednesday, December 2, 2015

Jingle On

Hello Cardz TV Gallery fans, Brenda here from Friends Craftin' with Friends and it's my turn to share a project with you. Right now my projects are simple and all done in advance, scheduled to post as I am taking time off since the passing of my husband. So please pardon my quickie cards. Crafty hugs, Brenda


Recipe:
Paper: Scrap piece from the Paper Studio-Hobby Lobby
Greenery:  Martha Steward branch punch

Tuesday, January 13, 2015

Some People Are Worth Melting For

Hello my crafty friends, I hope you are all doing well today. Don't faint at me posting a second time this week! lol We went to our granddaughter's birthday party on Sunday and of course like all little girls, she loves the movie Frozen and she loves Olaf. So I knew I wanted to make her an Olaf birthday card. So I search images on the web and found one that I liked and printed it out. I layered it on some lavender pattern paper, then I cut my white layer and using a Martha Steward punch, I punched the 4 corners out. I added some more snowflakes cut using My Creative Time snowflakes. I used white stickles on my corner snowflakes and purple stickles on my purple snowflakes. I used clear Wink of Stella on Olaf and tried to capture that in my first photo, enlarge the picture and you should be able to see it. I added some more snowflakes on the inside of my card and took My Creative Time letter stamps and made my "birthday Leah" and stamped it. Then I used My Creative Time "happy" die to die cut the word out of some of the same lavender pattern paper. And that is it. A pretty easy card to make and our granddaughter loved it. 


Here is our adorable granddaughter who shares a birthday with her papaw, we gave her an Olaf shirt too. 


Monday, April 30, 2012

Tissue Box Cover and Exciting News to Share!

Hi all my crafty friends! I have some exciting news!  There was a design team call for BBTB2 and my friend Suzanne, Cricut Craftin Grammy, was entering it and encourage me to enter as well.  I knew Suzanne would be chosen as she is mega talented, but never in a million years did I think I stood a chance!! lol  So when I got the email saying that I was chosen I was super stoked!!!  I still have to pinch myself to make sure I'm not dreaming all this up. lol  So this is the project I made, a tissue box cover for my MIL for Mothers Day.  The carts I used are:  Flower Shoppe, Mother's Day Boutique, Sweethearts, Mother's Day 2010, and George and Basic Shapes, Martha Steward doily punch and branch punch.  The dragon flies where sent to me by someone, so I'm not sure if that was a punch or not, but they worked perfectly with my color combo so I used them too. lol  My stars I cut off of George and then scored and folded them to make them 3D.  Love them!!  You can find the directions here for the tissue box. Thanks for sharing in my exciting news and thanks for all your lovely comments you leave me.  They certainly always make my day a little sweeter!